"The Events Calendar" add-on supercharges your website with advanced event features like recurring events, customizable views, and easy sharing. Learn how to create and manage events in this guide.
Note: if you are using the older, native events functionality and would like to learn more about using "The Events Calendar", reach out to web-solutions-support@arryved.com.
In this guide
Create an event
Let’s start in the WordPress dashboard — you should be able to find a menu entry called Events and, if you click on it, you should see the Add New link.

Once you’ve found it, go ahead and click on it! This should bring you to the event editor.
The event editor hopefully won’t contain too many surprises: it is intentionally almost identical — at least on first glance — to the regular page and post editor used by WordPress itself.
So, if you’re familiar with WordPress, you should feel right at home. Here is how to create an event:

- Add a title to your event
- Describe your event
- Select the date and time for your initial event (required)
- Set event recurrences (optional - see instructions below)
- Select an existing venue (location) or create your own (optional).
- Specify the event organizer (optional)
- Link to an external website about the event (optional)
- Set the cost of the event to show (optional)
- Add new event categories or select existing ones (optional)
- Determine if the event should be featured (optional)
- Upload a featured image to display in event listings (optional)
Create a recurring event
Let’s begin with the Time & Date settings for your event. If you are converting an existing single event into a recurring event, you have already set the start and end for the single event. If you’re creating a recurring event from scratch, the first options set the start and end for the first occurrence. The first occurrence will also dictate what kinds of pattern options are available.
You’ll see an option to Schedule multiple events. This option is located just below the Start/End options for your event.
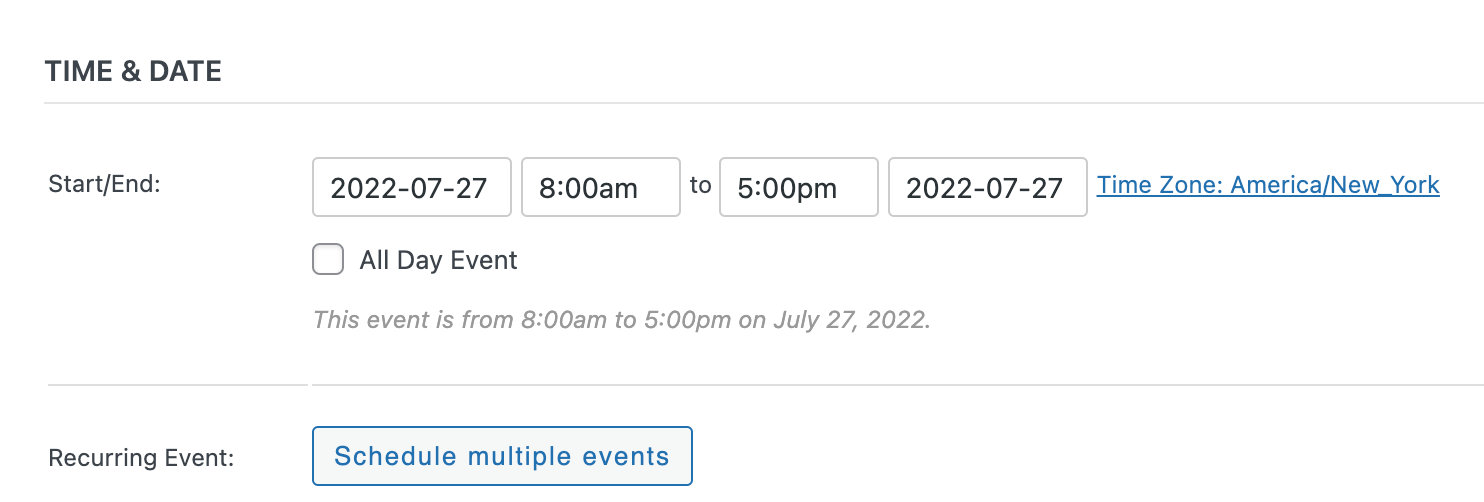
Click the Schedule multiple events button to display the first set of options for your additional events. You’ll then see a dropdown with the various recurrence types.
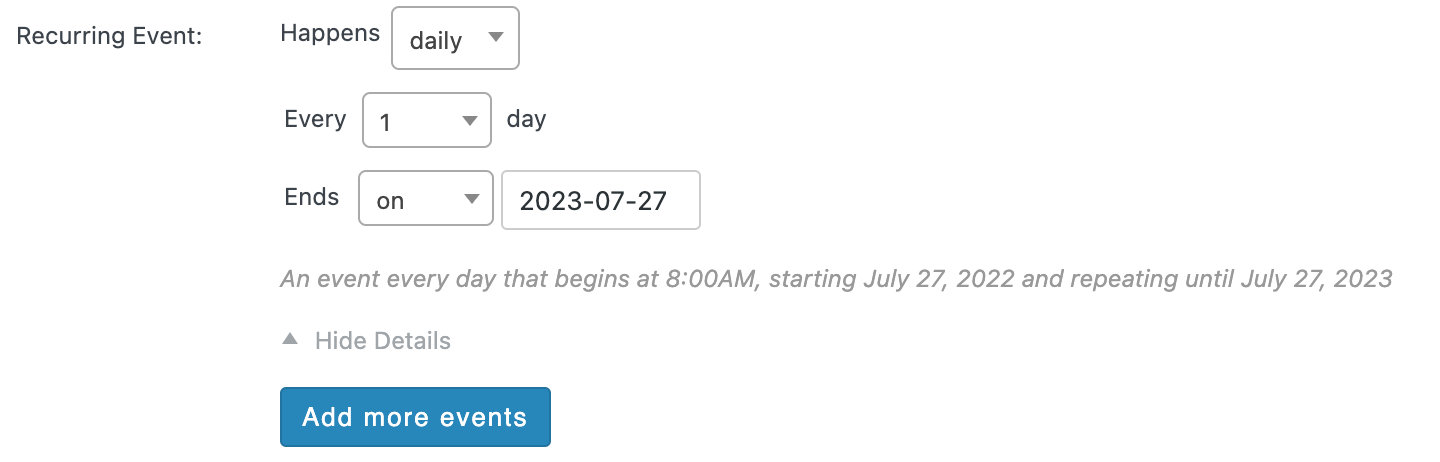
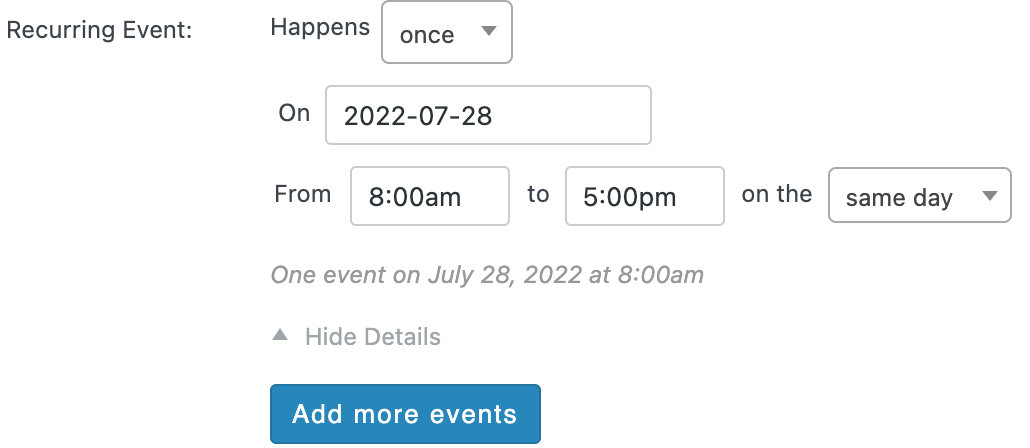
For recurring events that conform to a regular pattern, select the option that applies to your recurring event (Daily, Weekly, Monthly, or Yearly). If your event occurs on specific dates without following an established pattern, select the Once option for your event. We’ll go over the options for both patterned and non-patterned recurrences below.

Patterned recurring events
When you pick an option from the Happens dropdown, more fields will appear.

You can use those additional options to set the exact pattern you need for your event, for example:
- An event that recurs every three days
- A weekly event that recurs every week on Tuesdays and Thursdays
- A monthly event that always falls on the first Friday of the month
Ending a recurrence pattern
The Ends option allows you to dictate when a given recurrence pattern will stop repeating. The default option is never, which means that your event will repeat for up to 60 months in the future (aka 5 years).
Setting the End option to end on a given date lets you specify the last possible date an event from the sequence can take place. Example:
- You create an event starting Wednesday, October 4
- It recurs every week ending on Wednesday, October 25
- That final date is when the last event in the sequence will take place, not to be confused with the end date of the event itself
- If you selected Tuesday, October 24, then the last instance of the event would take place on the preceding Wednesday (October 18) instead
You can also set the pattern to end after a specific number of occurrences. For example, an event that happens every month and ends after 12 events will recur each month for a year.
In other words, the on and after options let you distinguish between inclusive and exclusive date ranges.
You can only add one pattern-based rule per event. If you have a more complex event, you can use the Series feature to group several recurring events together. You can also add as many individual occurrences to a recurring event using the Once option.
You can remove a set of recurrence rules at any time by clicking the trash can icon to the right.
Non-patterned recurrence
If your recurring event includes one or more event instances that do not occur as part of a greater pattern, you can add these events to your recurring event by using the Once recurrence type. You can add as many of these manual recurrences to your event as you want.
Exceptions
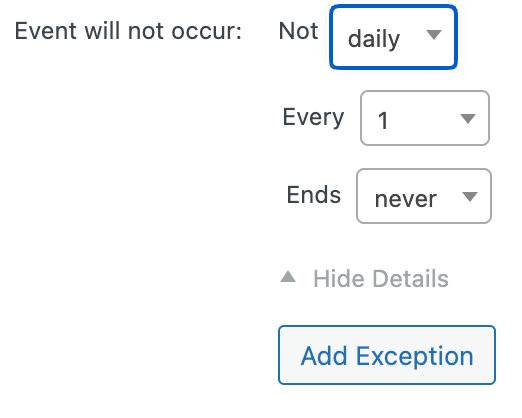
You can also exclude days or dates within a recurring event by using an Exception. For example, if you have an event that happens weekly on Fridays, you could choose to exclude the third Friday of every month. The recurring event would not appear on your calendar every third Friday.
The Add Exception option will appear as soon as you add any other recurrence rules. You can exclude occurrences based on a pattern, or choose individual dates.
Finalizing Your Recurring Event
Once you have set a recurrence pattern and/or added individual occurrences with the Once option, you can save the event. When you save, the recurring event occurrences will be created. If your event was not already in a Series, a new Series will also be generated as part of the recurring event save process.
Event Series
Event Series can be used to display and group any combination of single and recurring events.
Series differs from recurring events because, with recurring events, all events must contain the same event title, description, venue, and organizer. With recurring events, all events are generated simultaneously, containing all of the same information except for the date and time of the event. On the other hand, Series offers the flexibility to group events with different meta information.
For example, you may find the Series option useful if you have the same event occurring across multiple venues. You could create individual events with different venues and link them together with Series.
There are three ways to create a Series:
- From the WordPress dashboard
- From the event editor
- By creating a recurring event
Creating a Series from the dashboard
You’ll see a new menu item, Series, under Events in the WordPress Dashboard:

On the Series page, click on Add New to create a new Series from scratch.

Now you can begin to build your Series. You can add a title and description and select the events to add. It’s important to note that you cannot create events on the Series page, so you’ll want to create your events ahead of time, as you normally do.
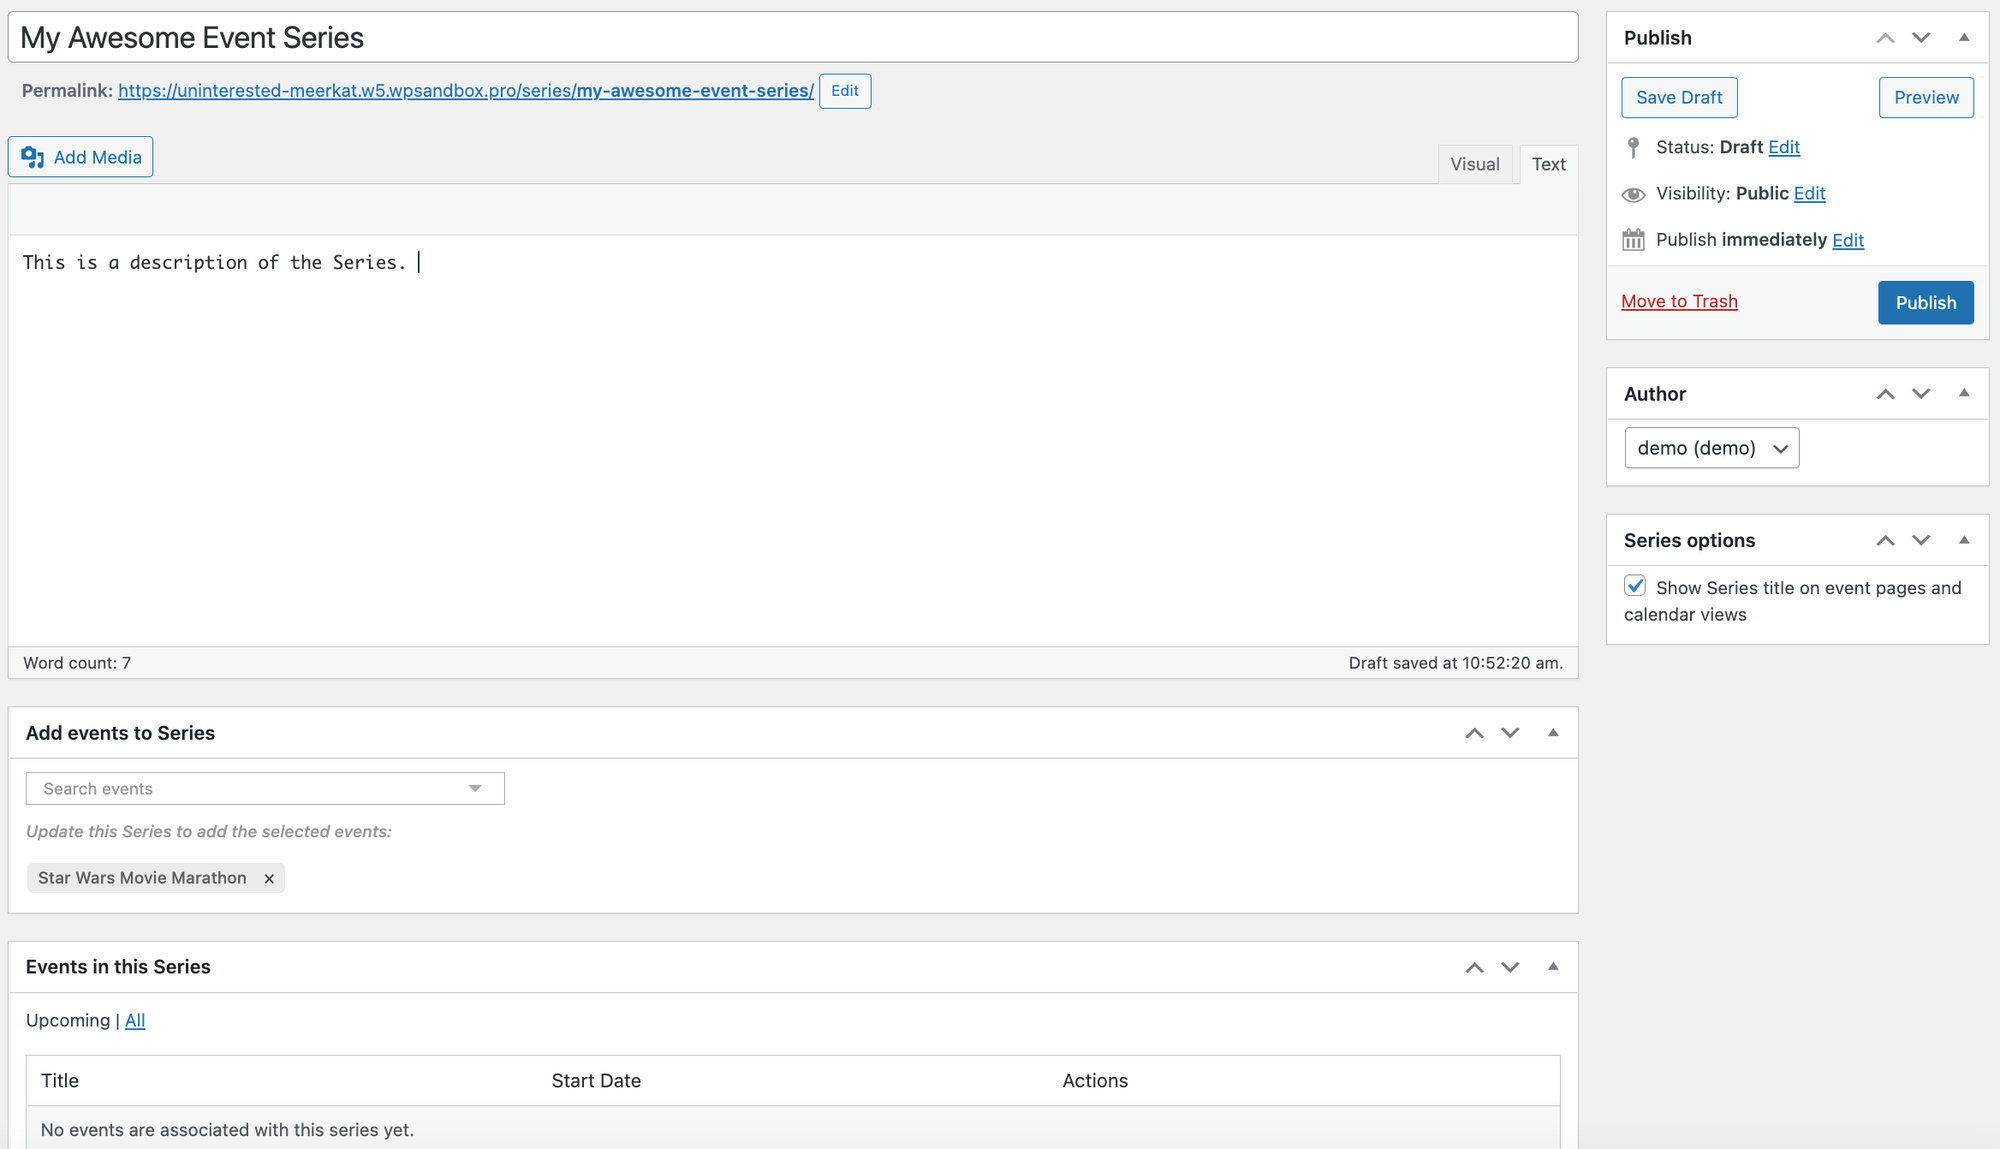
Once you publish your Series, your events will appear under the Events in this Series section. You can always return to this page to edit and manage your Series.
Create a Series from the event editor
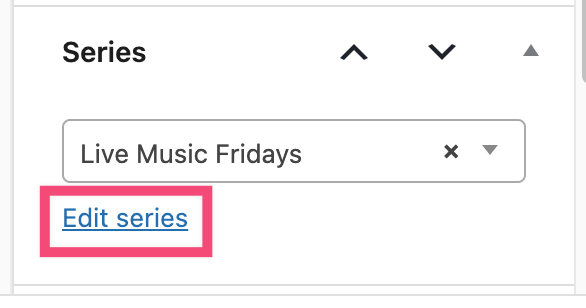
Whenever you’re creating an event, you have the option to add it to an existing Series. You can also create a new Series right from the event editor. You’ll find the Series dropdown in the sidebar:

When you create a Series from the event editor, you can only assign a title. However, once you save the event and the Series is generated, you can edit it to add a description or make other changes.
Automatically generated Series
Recurring events are always part of a Series. If you create a recurring event and don’t assign it to a Series, then a Series will be automatically generated when you save the event. Generated Series will have the same name as the recurring event. You can edit the Series by going to Events > Series or clicking the link in the event editor.
Removing events from a Series
To remove events from a Series, first, visit the Series page that you’d like to edit. Scroll down toward the bottom, and you’ll see options to Edit, View, and Convert to Single (if the event is recurring).
