Routing Local Deliveries
Please note that this tutorial focuses on how to route incoming local delivery orders utilizing Craftpeak's fulfillment and reporting platform Metorik, and other free sources such as Google Sheets and Google Maps. The guide applies best when logged into a Google account. Although this tutorial goes through the process of a shop with a single local delivery option, breweries/shops with additional delivery fulfillment options can still apply this process by simply adjusting the *Shipping Method Title* filter on Metorik in steps A3
A. Exporting Local Delivery orders from Metorik
1. Login to your Metorik account
2. Select the Orders tab
3. Create the following filters for your new Local Deliveries segment (we will save this segment later)
- Order Status *is not in* Completed, Failed, Cancelled
- Shipping Method Title *is in* (select the name of your delivery method, e.g. "Local Delivery")
- Optional ~ Order Created *in the last* 7 days (or any other preferred time frame)
4. Metorik should now be filtering your delivery orders that are ready for routing. To save this segment for future use, click the Save Segment button at the bottom of the filters section, name the segment, and decide whether to save for the Whole Team or just yourself before hitting the blue save button. To load this segment in the future, click the Choose a Segment button in the top right corner of the filters section
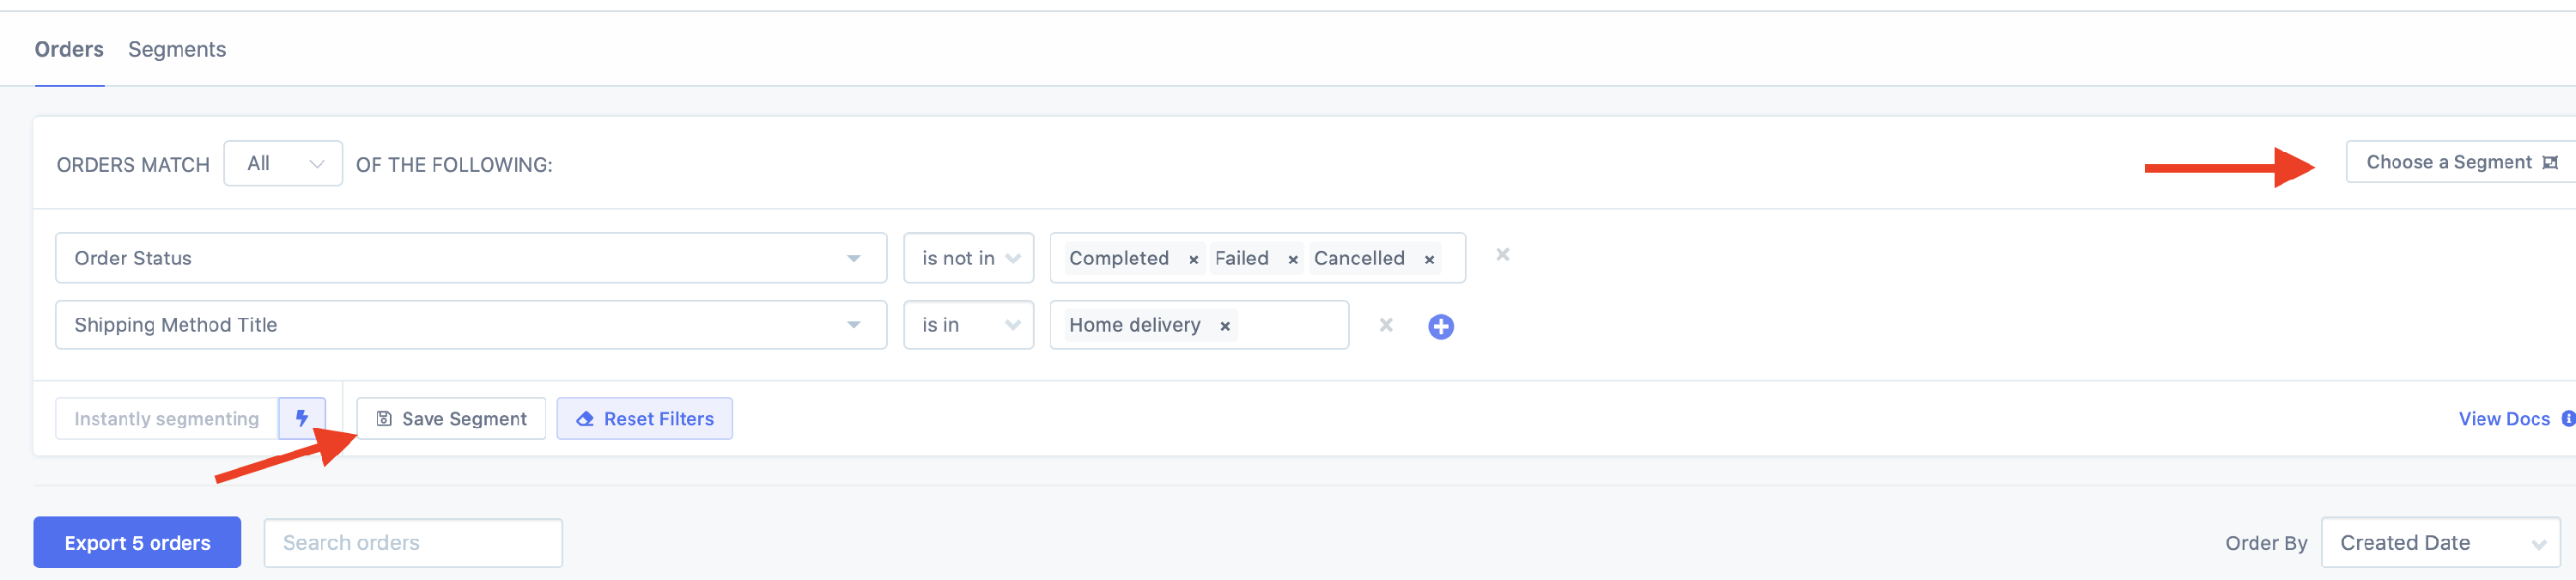
5. Next, you'll want to export this segment by selecting the blue Export button above/left of the orders list
6. Once the export pop up window opens, we'll want to customize the format of our export to only contain pertinent information for our delivery drivers by clicking All Settings within the popup
7. We will want to click Customize Columns and include the following criteria:
- order_number
- shipping_address_first_name
- shipping_address_last_name
- billing_address_phone
- shipping_address_address_1
- shipping_address_address_2
- shipping_address_city
- shipping_address_postcode
- lineItems
- total
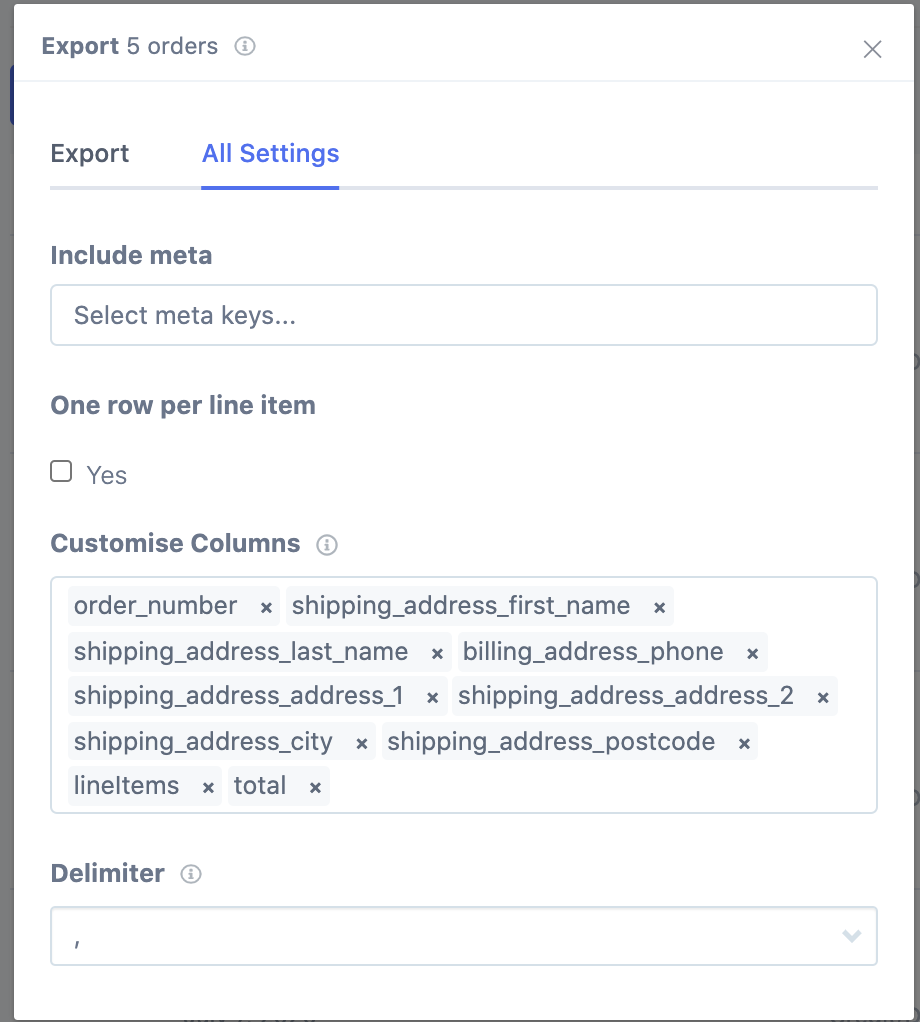
*Feel free to add or remove any data here that better suites your process*
8. Once these are selected, switch back to the Export tab and click the blue Download button - this will download a CSV file. You'll want to note the location of the file as we will import it into Google maps in the following steps
**Optional** Importing Local Delivery orders into a Google Sheets
This optional step will allow us to keep a more organized history of delivery orders and the route/order of delivery our driver(s) takes in a spreadsheet format.
1. Open up a new or existing google sheet which we will name "Delivery Orders"
2. Make sure you are working within an empty tab of the spreadsheet before clicking File>Import>Upload>Select a File> then selecting the downloaded CSV from our Metorik export in steps A8
3. On the Import file settings on Google Sheets, we'll want to select the following criteria selected
- Import location: Replace current sheet
- Separator type: Detect Automatically
- Convert text to numbers... Yes
4. Select Import data
You will now have all delivery orders from the segmented Metorik export in the spreadsheet. They will still need to be re-arranged and sorted to show the correct delivery route for the day. See steps below
B. Importing Local Delivery orders into Google Maps
In this step, we'll importing the delivery orders as dynamic waypoints into Google Maps. From there you will be able to route the deliveries yourself or pass the way-pointed map along to the driver.
1. Open up https://mymaps.google.com and click the red plus button at the bottom right of the screen to create a new map
2. Once a fresh map is opened, we'll click the blue Import button in the top left box underneath the default 'Untitled Layer' text
3. From here, you will want to upload the CSV file we originally downloaded in steps A8
4. Once uploaded, the first popup you will see will request you to "Choose columns to position your placemarks".
Select the following 4 check boxes - Shipping Address Address 1, Address 2, City, Postcode
This should be enough geographical location for Google maps to create accurate waypoints on the map
5. The next popup will request us to "Choose a column to title your markers"
Typically, we'll want to work with the customers last name, however, the title of the markers can also be the order number or first name.
6. At this point, we should have all our delivery orders setup as markers within the map and can now begin to routing the delivery orders.
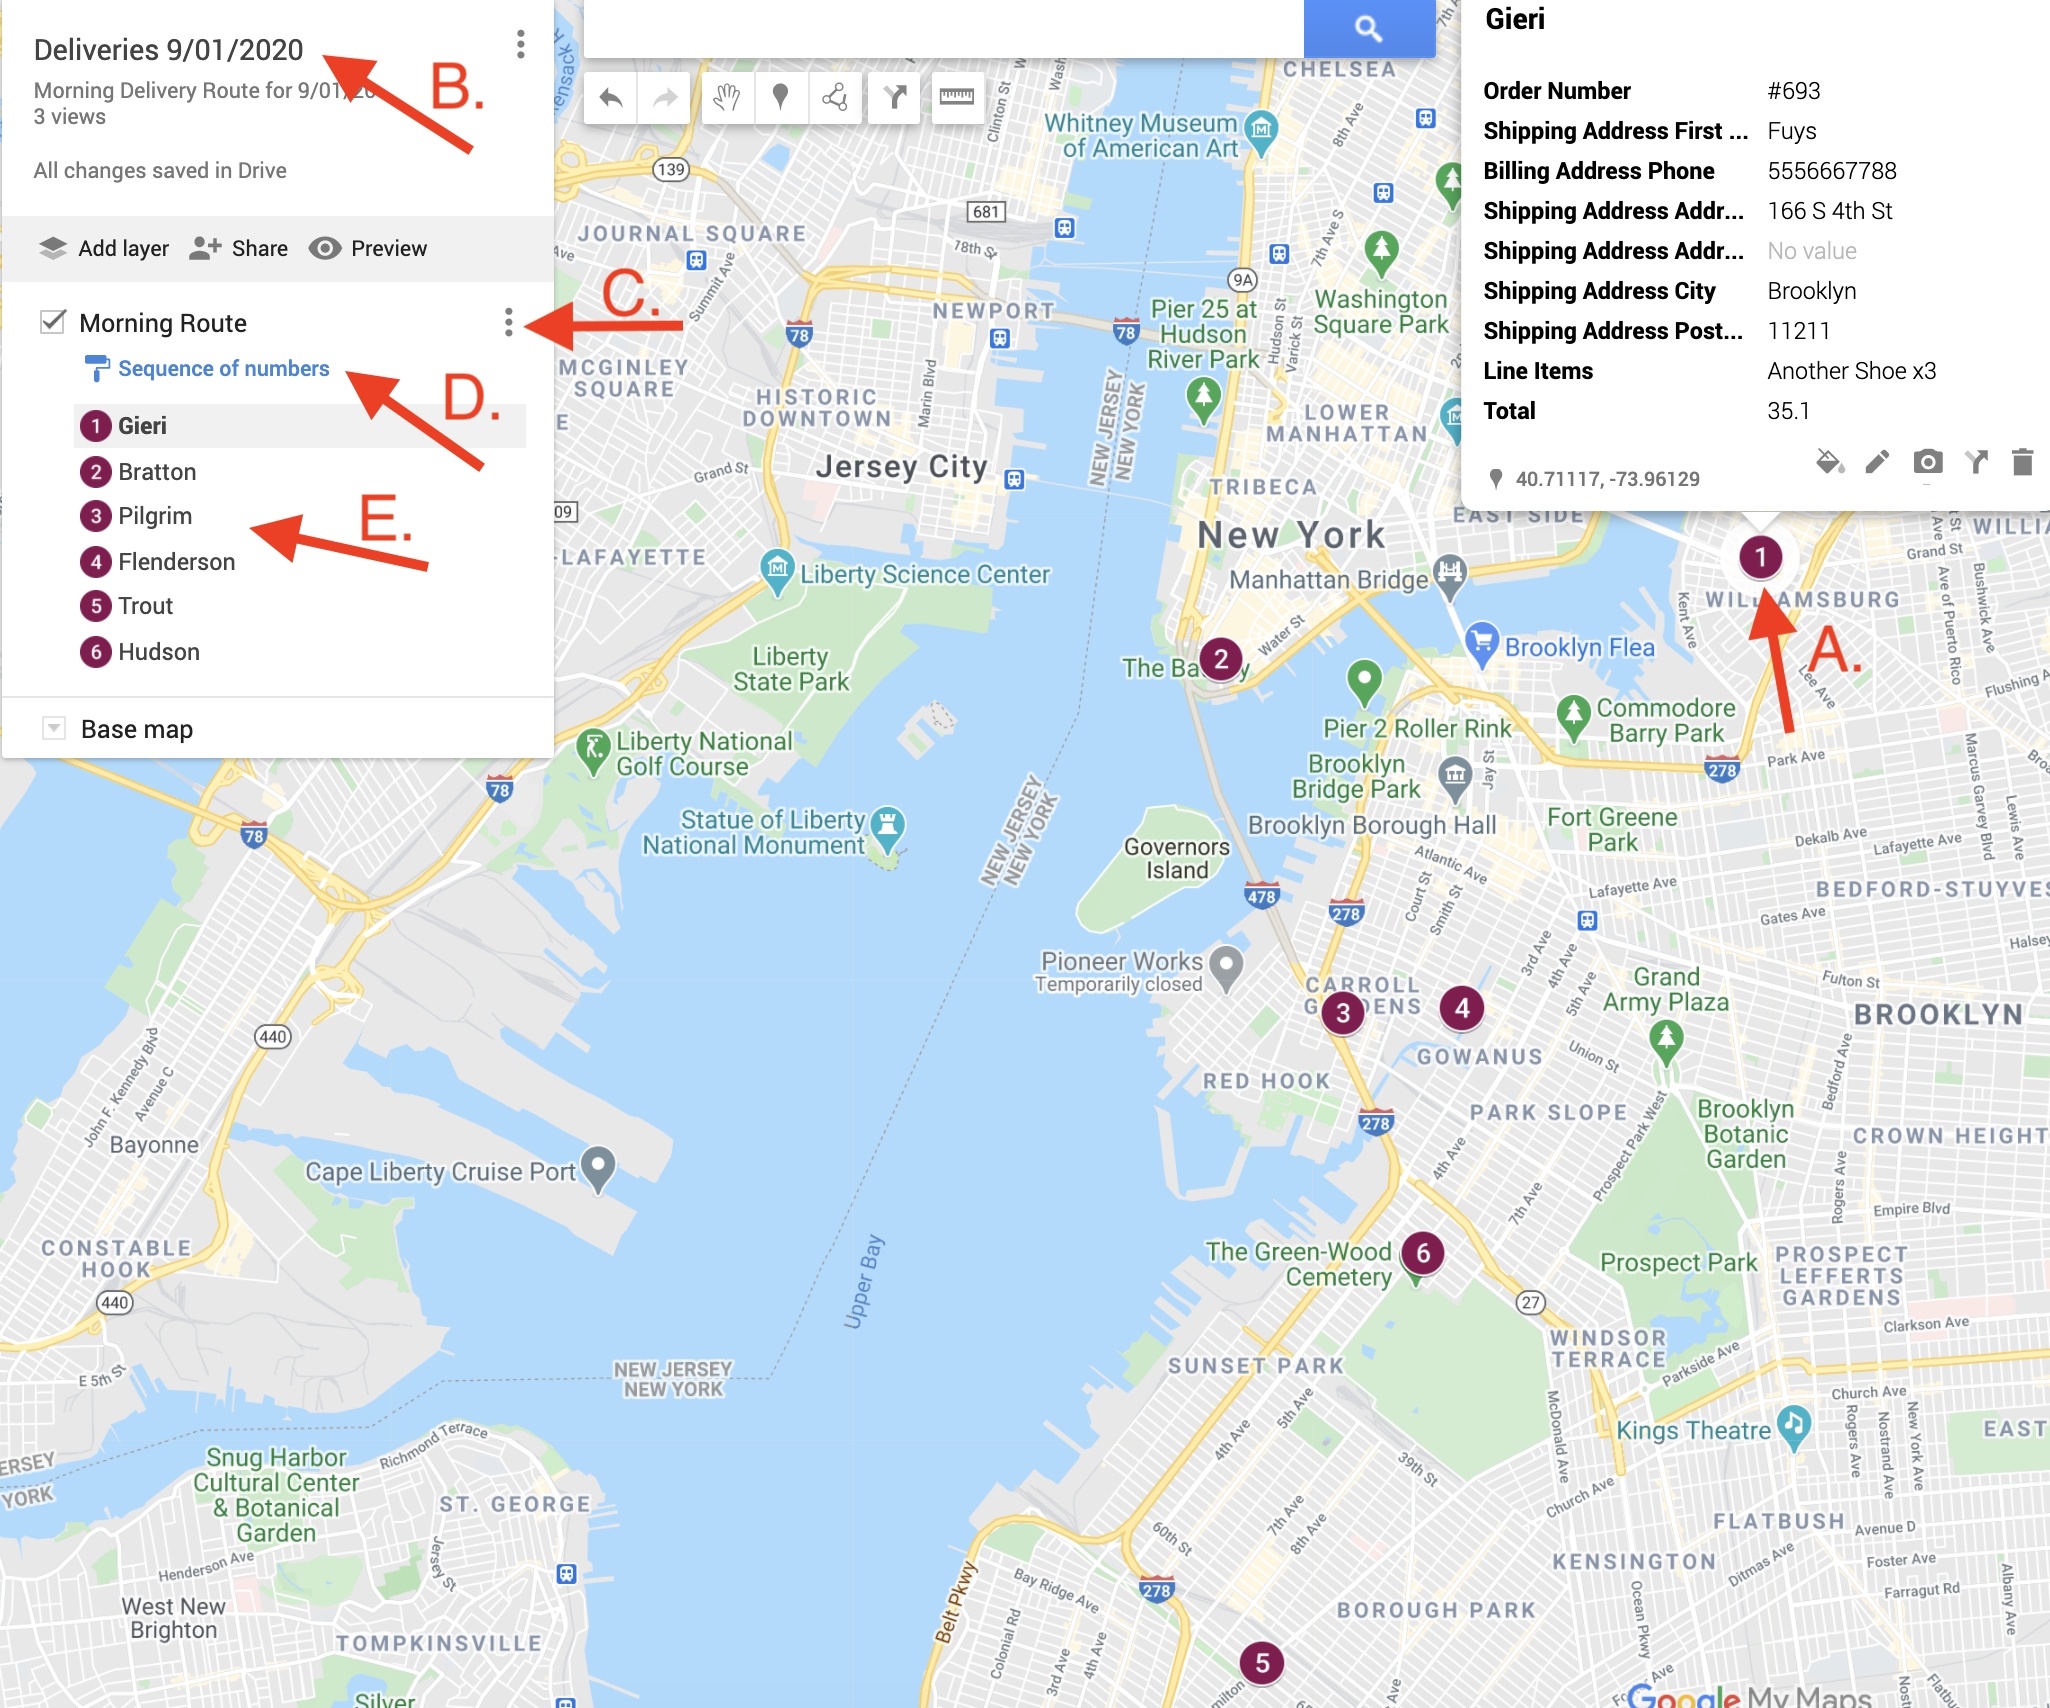
If this is your first time working with a Google Map containing multiple waypoints, see screenshot and steps below for quick setup guide.
A. Clicking on your waypoints will display all of the data we originally exported from Metorik (including Line Items and the customers phone number). You are able to edit this info too if necessary
B. Rename the custom map and add a description
C. Rename the route (layer) you will be working with. You can eventually create more layers for additional delivery times, drivers, or additional areas as well
D. There are many options to adjust the way you view your waypoints such as grouping, styling, adding additional labels etc. We've found the best way to route your deliveries in a clear and efficient way is by having all waypoints show as a Sequence of numbers. From there you can adjust the waypoints by dragging and dropping them into the ideal delivery order within the layer.
E. With Sequence of numbers turned on, waypoints can be adjusted by dragging and dropping them into the ideal delivery order within the layer itself. Waypoint colors can also be adjusted uniformly, or individually if not being organized by Sequence of numbers.
 This concludes our tutorial!
For additional questions, please reach out to support@craftpeak.com and cc konrad@craftpeak.com